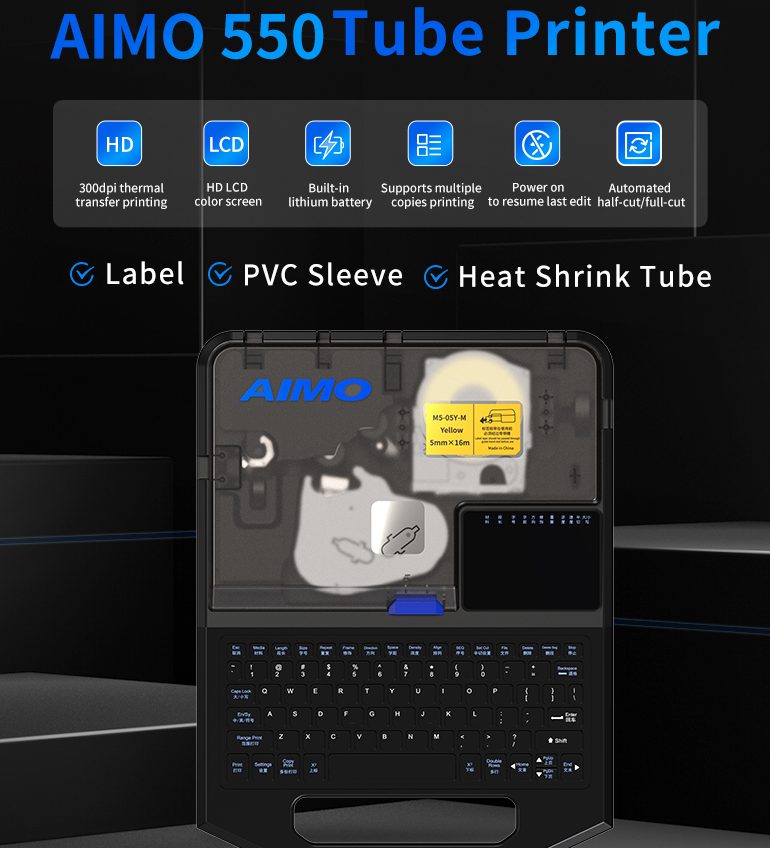


How to Use AIMO M550 for Wire Label Printing | Complete Quick Guide
Welcome to the AIMO M550 Tube Printer quick guide. Whether you’re a first-time user or an experienced technician, this guide will walk you through the essential steps for wire label printing, understanding the LCD display, installing consumables, and replacing the cutter assembly.
The AIMO M550 is a professional-grade PVC tube printer designed for electrical, telecommunications, and industrial applications. With 300dpi print resolution, 40mm/s print speed, and a built-in lithium battery, it’s the ideal cable ID printer for field and workshop use.
Chapter 1: Wire Label Printing Instructions
1.1.External component names

| No. | Name | Description |
|---|---|---|
| ① | Keyboard | For text input and menu navigation |
| ② | Open Cover Key | Opens the printer cover to access consumables |
| ③ | Color LCD Display Screen | Shows settings, text, and print preview |
| ④ | Printer Cover | Protects internal components and consumables |
| ⑤ | Ink/Toner Level Observation Windows (Two) | Check ribbon/toner levels at a glance |
| ⑥ | Power Adapter Interface | Connect AC power adapter |
| ⑦ | USB Port (Type A) | Connect to PC for data transfer |
| ⑧ | Power Switch | Turn printer on/off |
| ⑨ | Printer Lower Cover | Access to cutter and internal mechanisms |
1.2.LCD Display instructions
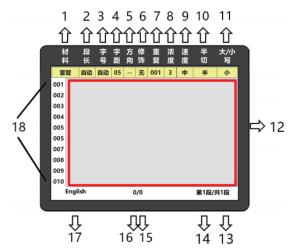
The HD color LCD screen is your command center. Here’s what each prompt means:
| No. | Text Prompt | Explanation |
|---|---|---|
| 1 | Material | Currently selected consumable type (PVC tube, heat shrink, label) |
| 2 | Length | Length of the current paragraph |
| 3 | Font size | Font size of the paragraph |
| 4 | Letter spacing | Spacing between characters in the current paragraph |
| 5 | Orientation | Current print orientation (horizontal/vertical) |
| 6 | Decoration | Add border, underline, or remove decoration |
| 7 | Repetition | Print repetition count for the current paragraph |
| 8 | Concentration | Current print concentration/darkness setting |
| 9 | Speed | Current print speed setting |
| 10 | Half-cut | Half-cut, full-cut, or none setting |
| 11 | Upper/lower case | Uppercase or lowercase input mode |
| 12 | Text editing box | Area to edit printable text content |
| 13 | Editable paragraph count | Total number of paragraphs supported by this printer |
| 14 | Current paragraph | Paragraph number where cursor is located |
| 15 | Total characters in paragraph | Total number of characters in current paragraph |
| 16 | Character position | Cursor position within the paragraph |
| 17 | Input method | Current input method (Chinese, English, Symbol) |
| 18 | Paragraph marker | Marker displayed on current LCD screen |
Chapter 2: Installation of consumables
2.1.Installation and removal of ribbon box
2.1.1.Installation of ribbon box
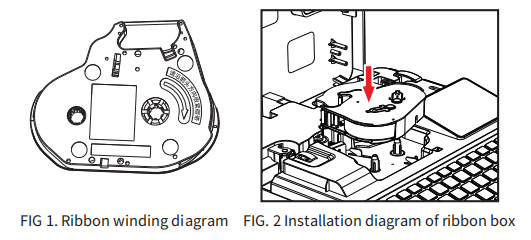
①As shown in Figure 1, wind the ribbon in the direction of the arrow on the ribbon box to tighten the ribbon (turn clockwise).
②Open the upper cover of the printer when the machine is turned off.
③As shown in Figure 2, place the ribbon box in the place (R) indicated by the on-line number machine, and place it downward;
2.1.2.Ribbon box out
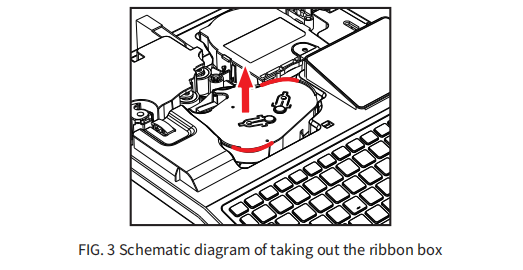
(1)When the printer is off, open the upper cover;
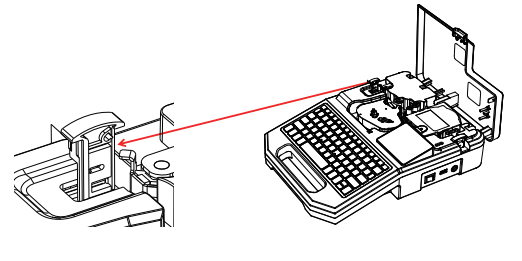
(2)According to the arrow position in Figure 3, press the red line with your hand to take out the ribbon box;
2.2.Installation and removal of carton
2.2.1.The installation of the paper box
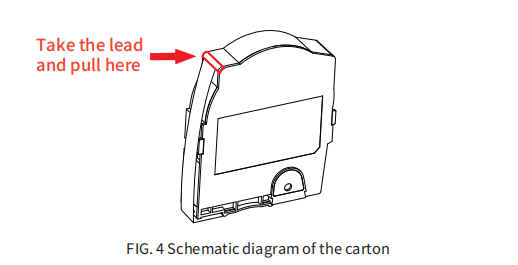
(1)Open the upper cover of the printer, and gently pull the sticker out of the carton to the protruding position in the upper left corner of the carton (see Figure 4);
(2)Gently place the carton in the card position;
①As shown in Figure 1, wind the ribbon in the direction of the arrow on the ribbon box to tighten the ribbon (turn clockwise).
②Open the upper cover of the printer when the machine is turned off.
③As shown in Figure 2, place the ribbon box in the place (R) indicated by the on-line number machine, and place it downward;
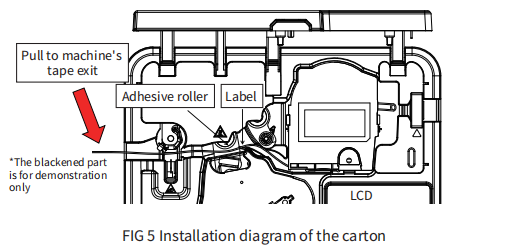
(3)The installation position of the carton is shown in Figure 5. Push the front edge of the sticker over the main rubber roller and pull it to the outlet of the machine (about the size of the index finger) to ensure thatthe ribbon can be correctly pressed to the sticker. Take the machine screen as reference, the sticker is on the top and the carbon belt is on the bottom;
(4)Close the upper cover.
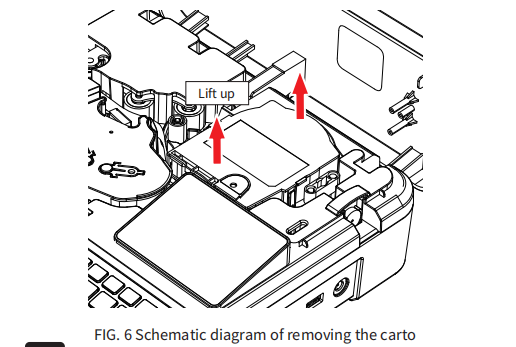
2.2.2.Take out the carton
(1)Open the printer cover; (The machine is turned off)
(2)Drag and pull out the latch on the right side of the carton from the slot in the printing material fixing seat of the wire marking machine;
(3)Close the printer cover;
2.3.Installation and removal of casing
2.3.1.Casing installation
(1)Open the printer cover;
(2)Follow the screen printing instructions in the machine, pass the
casing through the casing dust collector, printing roller, cutting edge;
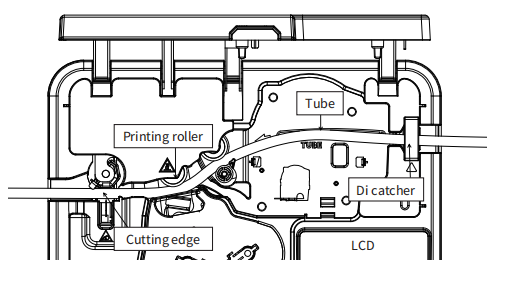
(3)Pull the casing to the outlet of the machine;
(4)Close the printer cover;
2.3.1.Casing installation
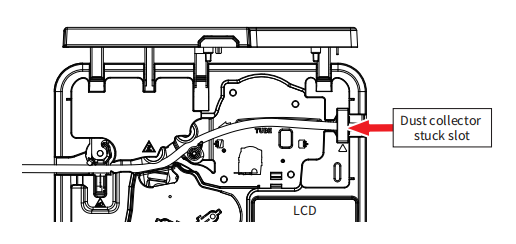
(1)Open the printer cover;
(2)Pull the casing out of the slot of the dust collector of the wire marking
machine in the direction of the machine; (as shown below)
(3)Close the printer cover;
Chapter 3 :chapter is the replacement of cutter assembly
3.1.Change of half cutter
Explain:
1.Be careful not to scratch your fingers when replacing the half cutter and cutting board components;
2.The half cutting effect does not meet the requirements. Replace the half cutting knife and cutting board components at the same time.
(Please purchase the original cutting knife and cutting board
3.Remove the cutter and insert a new half cutter.
3.2. Replacement of cutting board components
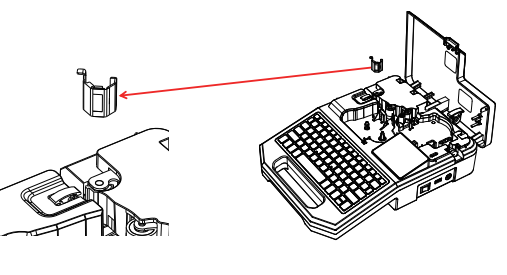
(1)Remove the sticker or sleeve from the line marking machine;
(2)Pull out the cutting board assembly, moving up the edge;
(3)Insert the new cutting board assembly;
Chapter 4 :Basic Operations
In order to print the content correctly, please set the material and specification options correctly to ensure that the setting of the line marking machine is consistent with the material and specification you actually use.
4.1.Casing, heat shrink tube printing
(1) Install the printer and carbon tape box as described in “2 Printer and Consumables Installation”;
(2) Insert the sleeve or heat shrink tube into the tube position until the front end of the sleeve or heat shrink tube touches the printing roller,close the upper shell of the printer until the clicking sound is heard, and the lock state is reached.
(3) Turn on the power switch, click the “Material” button after turning on the machine, the screen will display: the left and right arrows up and down the machine can choose the appropriate size of consumables;
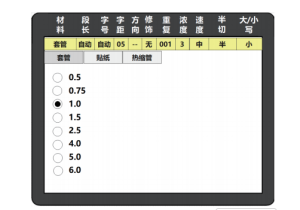
(4) According to the specifications of the installed sleeve or heat shrink pipe, use 【 】 and 【 】 keys to make a correct selection, press 【 Enter 】 key to enter the text input interface, you can edit the content to be printed;
(5)Press the [Chinese/English/symbol] key to switch the input method,input letters, numbers, Chinese or symbols, such as: Input M, 5,5,0, line number machine, the screen will display [M550 line number machine],as follows:
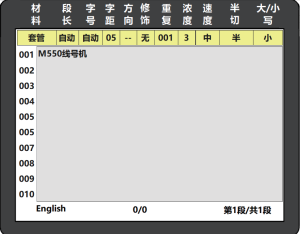
Press the [Enter] key to automatically generate the next paragraph, and edit the content to be printed in the same way;
(6) After editing, press [Print] to print. After printing, it will automatically
return to the text input interface.
Explain:
Font size: If not set, the default font size; If the selected font size exceeds the consumable specification, a font error is displayed
Segment length: If this parameter is not set, it is automatic by default. If you enter the print content before setting the segment length, and the input print content exceeds the segment lengthsetting, a setting error window is displayed.
Kerning: If not set, the default kerning is 05;
Repeat: If it is not set, the default value is 1.
Explain:
0.5 square casing single line can correctly print 1/2 word;
0.75 square casing single line can correctly print 1/2/3 characters
1.0 square casing single line can correctly print 1/2/3/4 characters; Double lines can correctly print No. 1 word;
1.5 square casing single line can correctly print 1/2/3/4/5 characters; Double lines can correctly print 1/2 word;
2.5 square casing single line can correctly print 1/2/3/4/5 characters; Double lines can correctly print 1/2 word; Three lines can correctly print No. 1 word;
4.0 square casing single line can correctly print 1/2/3/4/5/6 characters; Double lines can correctly print 1/2 word; Three lines can correctly print No. 1 word;
5.0 square casing single line can correctly print 1/2/3/4/5/6/7 characters; Double lines can correctly print 1/2/3 characters; Three lines can correctly print No. 1 word;
6.0 square casing single line can correctly print 1/2/3/4/5/6/7 characters;
Double lines can correctly print 1/2/3 characters; Three lines can correctly print 1/2 word;
Ø2.0 Heat shrink tube single line can correctly print 1/2/3/4/5 word; Double lines can correctly print 1/2 word;
Ø3.0 Heat shrink tube single line can correctly print 1/2/3/4/5 words;
Double lines can correctly print 1/2 word; Three lines can correctly print No. 1 word;
Ø4.0 Heat shrink tube single line can correctly print 1/2/3/4/5/6 word;
Double lines can correctly print 1/2 word; Three lines can correctly print No. 1 word;
Ø5.0 The heat shrink tube single line can correctly print 1/2/3/4/5/6/7
characters; Double lines can correctly print 1/2/3 characters; Three linescan correctly print 1/2 word;
Ø6.0 Heat shrink tube single line can correctly print 1/2/3/4/5/6/7/8
characters; Double lines can correctly print 1/2/3/4 words; Three lines can correctly print 1/2 word